with minimum brain, using guide from viewtopic.php?f=91&t=3119 and viewtopic.php?t=6433 I built a genuine terramaster nas. the only thing that is not working is the reset button (factory defaults)
proxmox network reload and reset
https://pve.proxmox.com/wiki/Network_Configuration
If you made manual changes directly to the /etc/network/interfaces file, you can apply them by running ifreload -a
The document was saved successfully, but Excel cannot re-open it because of a sharing violation. Please close the document and try to open it again
Make a backup of the file
Open the file
Click on ‘File‘ and ‘Inspect Workbook‘
In my case it found ‘Custom XML Data’
If you don’t know where this comes from and what it does, remove it
Save it – should work normally now
https://answers.microsoft.com/en-us/msoffice/forum/all/the-document-was-saved-successfully-but-excel/edb4f192-546b-4fa9-8c04-42e3f631046b
Repair windows 10 after install corel
What You should do is:
- Open regedit.exe
- Right click on HKEY_CLASSES_ROOT and select permissions
- Click Add -> Advanced -> Find Now
- While holding SHIFT button select: “Administrators” “Users” “All Application Packages” “Owner Creator”
- Click OK -> OK
- Make sure that there Are “System” and “Owner Creator” listed as well:
If there is “All users” position remove it.
There should be 5 entries:
All Aplication data should have only Read permissions
Owner Creator -> only special permissions
System – > Full control, and read permissions
Administrators -> Full control, and read permissions
Users -> Only read permissions
- Click apply
- Click Advanced
- Click Enable inheritance, then mark “Replace all child object permission entries with inheritable permission entries”
- Click apply -> OK
- OK, now You’re done, and you can log in for plain user account and Menu start, modern apps and explorer.exe should work properly now.
If you experience white menu bar problem, set up program compatibility to Windows XP SP3.
sau powershell:
$acl = Get-Acl Registry::HKEY_CLASSES_ROOT
$person = [System.Security.Principal.NTAccount]”ALL APPLICATION PACKAGES”
$access = [System.Security.AccessControl.RegistryRights]”ReadKey”
$inheritance = [System.Security.AccessControl.InheritanceFlags]”ContainerInherit”
$propagation = [System.Security.AccessControl.PropagationFlags]”None”
$type = [System.Security.AccessControl.AccessControlType]”Allow”
$rule = New-Object System.Security.AccessControl.RegistryAccessRule($person,$access,$inheritance,$propagation,$type)
$acl.AddAccessRule($rule)
Set-Acl Registry::HKEY_CLASSES_ROOT $acl
surse:
How to Fix Windows 10 Start Menu and Cortana can’t be Clicked after Installing Corel Draw
https://support.microsoft.com/en-us/help/2798317/microsoft-store-apps-fail-to-start-if-default-registry-or-file-permiss
https://community.coreldraw.com/talk/coreldraw_graphics_suite_x4/f/coreldraw-x4/51500/install-coreldraw-graphics-suite-x4-on-windows-10-fresh-install
How to Fix Printer Error 0x00000709 on Windows
1] Uninstall KB5006670 Cumulative update (din control panel, updates, sau linie de comanda admin wusa /uninstall /kb:5006670 )
2] Run Printer Troubleshooter msdt.exe /id PrinterDiagnostic
3] Disable the Windows 10 managing Printers automatically
4] Configure PointAndPrint registry (cmd as admin, reg add “HKEY_LOCAL_MACHINE\Software\Policies\Microsoft\Windows NT\Printers\PointAndPrint” /v RestrictDriverInstallationToAdministrators /t REG_DWORD /d 1 /f )
5] Use the Registry Editor (
Click on the Start button and type “Regedit” from your keyboard.
Select the Registry Editor application from the best match.
If UAC prompts on the screen, click on the Yes button to give your permission.
In the Registry Editor window, navigate to the path –
HKEY_CURRENT_USER\Software\Microsoft\WindowsNT\CurrentVersion\Windows
Move to the right pane and double-click on the Device option.
In the popup menu, give the name of the printer inside the Value Data field.
Clicking on the OK button, a new error may appear saying – “Cannot edit Device: Error writing the value’s new contents”.
In this case, you need to set the permission of the key.
So, go to the left pane and do a right-click on the Windows folder as shown in the below snapshot.
From the context menu, select the Permissions option.
Go to the Group or user names section, and select Restricted.
Again, go to the Permissions for Restricted section and mark the checkbox next to the Full Control and Read option.
Finally, click on the Apply and then OK button.There is a UserSelectDefault option in the right pane.
Right-click on this option and rename it as the printer name.Now, reboot your computer and that’s it.)
src: https://www.howtoedge.com/fix-printer-error-0x00000709-on-windows-10/
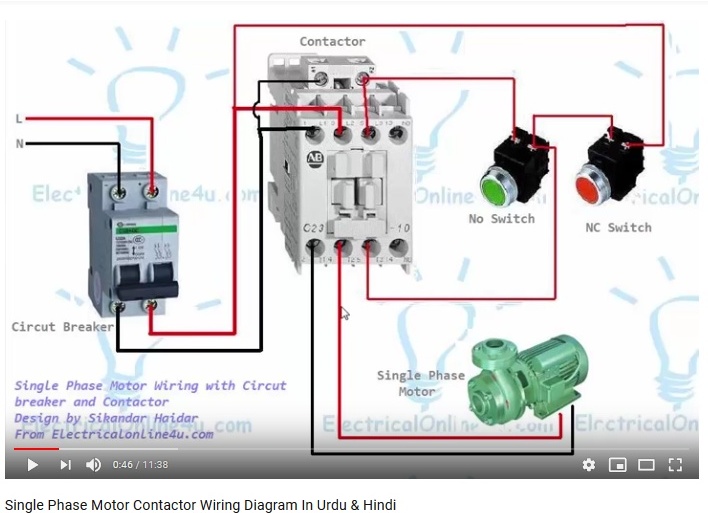
schema pornire motor cu contactor

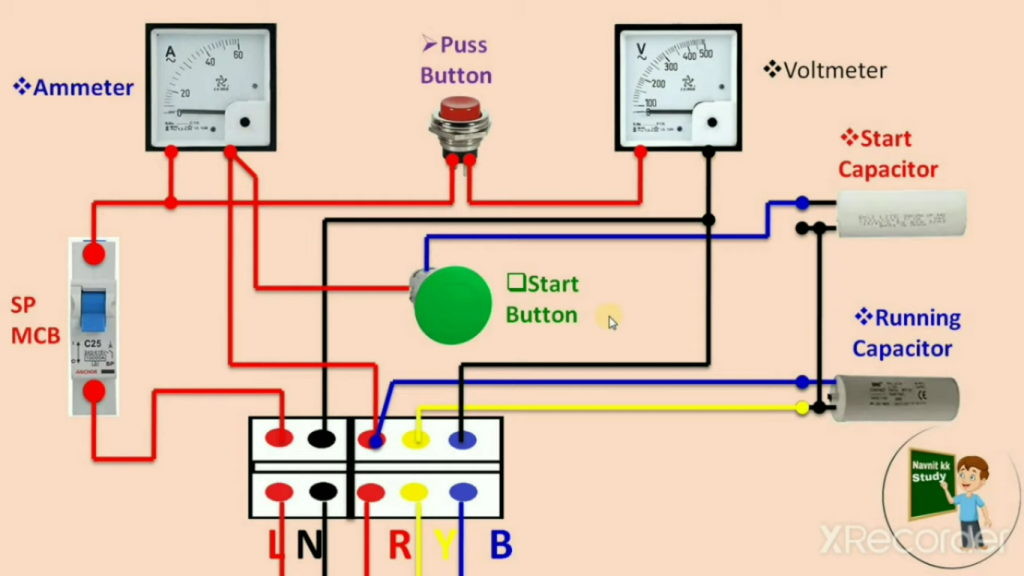
schema starter motor cu doi condensatori

calcul valoare condensator motor trifazic legat la monofazic

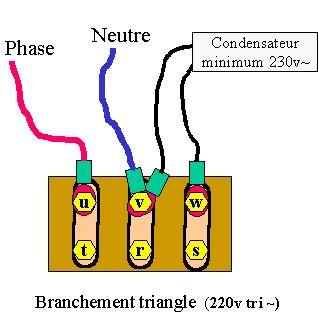
To connect our 380v tri motor in 220v mono (phase + neutral), we will use the triangle coupling.
We will connect for example: the phase in “u”, the neutral in “v”, and it will be necessary to add a capacitor between “v” and “w”
Very important !The capacitor must have a voltage greater than 230V and must be AC ??~, NEVER use a polarized capacitor otherwise it will explode!The usual value of the capacitor is expressed in micofarad “µf”
To find its value it is enough to multiply the power in CV by 50.
Example: a 250w motor (0.25kw)
to begin, you have to convert Watts into horses. for this we divide the watts by 736 (1 CV = 736 W)
In our example 250/736 = 0.34 HP, our engine is 0.34 HP.
To find the value of the capacitor: 0.34 x 50 = 17, so to operate the motor of 0.25kw requires a capacitor of 17 μf.
If the value of the capacitor is less than 17 μf, the motor will work much worse, or not at all.If the value is greater than 17 μf it is not annoying at all.
downgrade windows 7
Choose Run and write regedit.
Go to: HKEY_LOCAL_MACHINE\SOFTWARE\Microsoft\Windows NT\CurrentVersion
Change the keys EditionID and ProductName.
EditionID can be found in your Windows 7 installation CD under sources\ei.cfg.
ProductName will be shown when you try to install and are denied:
Windows 7 Ultimate cannot be upgraded to Windows 7 Home Premium
Here the Windows 7 Home Premium is the ProductName.
Make sure that it matches exactly.
This procedure worked like a charm for me!
make windows bootable after motherboard swap
In the BIOS, i went change the SATA to IDE mode (NOT RAID, NOT AHCI)
1.Boot Win7 DVD
2.Choose the Language Selection.
3.Choose Repair.
4.On the recovery tools choose the Command Line Console
5.Type:regedit <ENTER>
7.Highlight HKEY_LOCAL_MACHINE
8.File > Load Hive
9.Select < windows partition with problem > \Windows\System32\config\system (Backup this first, it’s advised)
10.Regedit will ask for a Key name: Name it something like “temp”
11.Located HKEY_LOCAL_MACHINE/temp/Select/Current
12.Searched for every key containing the value “SCSI Miniport” where the “Start” value was a “3” and changed the “Start” value to a “0”. (F3 to search next result).
13.Highlight “temp”
14.File > Unload Hive
15.Restart
16.Enter in Win7 🙂
vezi si https://social.technet.microsoft.com/Forums/es-ES/19c703a4-f52a-4b90-8a8c-fd80cbaf9c7a/windows-7-no-boot-stop-0x0000007b-and-classpnpsys-problem?forum=w7itprogeneral
